


Samantha Santana Wallpaper
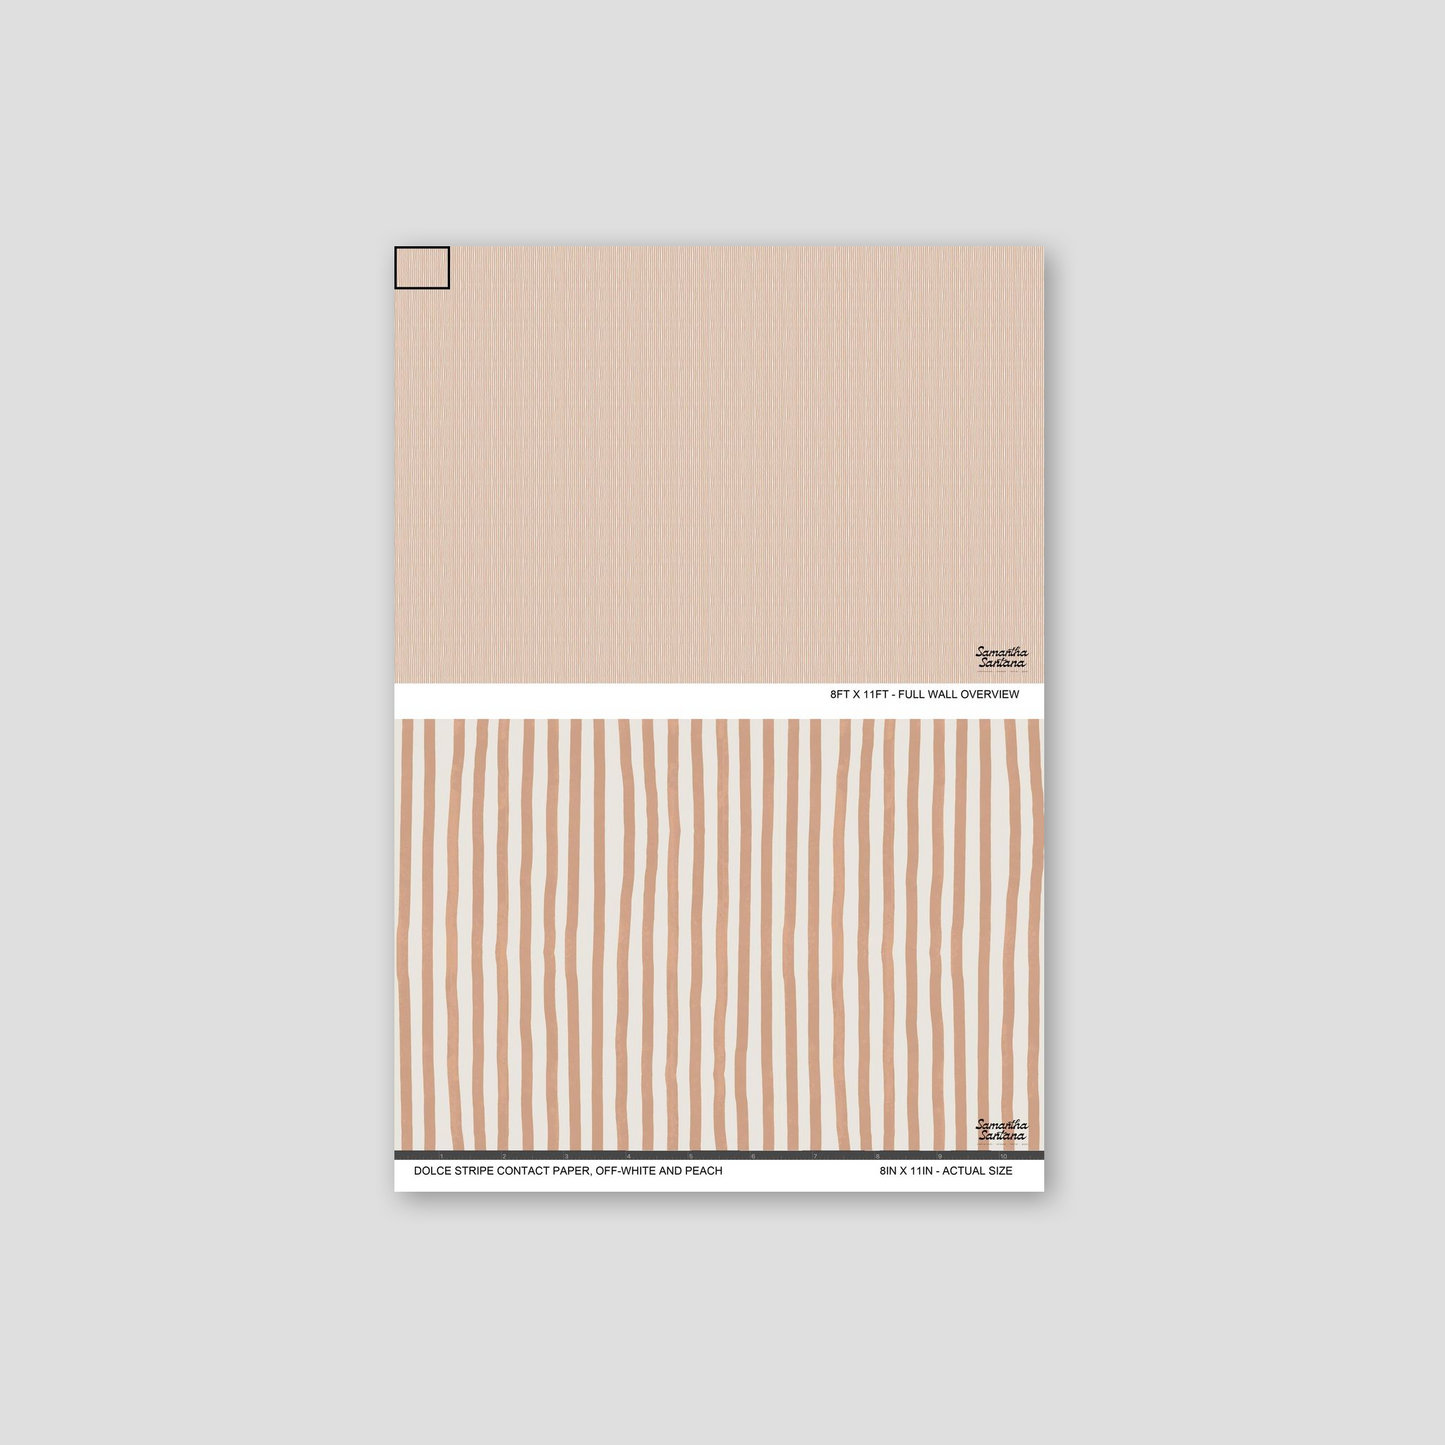
Dolce Stripe Contact Paper, off-white and peach
Dolce Stripe Contact Paper, off-white and peach
Couldn't load pickup availability
Dolce Stripe Contact Paper – Removable Stripe Shelf Liner & Vintage-Inspired Peel and Stick Contact Paper by Samantha Santana
Elevate your space with Dolce Stripe Contact Paper, a fresh take on the timeless stripe designed by California surface pattern designer Samantha Santana.
Inspired by nostalgic candy stripe patterns, this vintage-inspired design reimagines a classic motif with a modern hand-drawn feel and a curated terra cotta and olive green color palette. The soft organic lines add warmth, movement, and effortless charm, creating a stripe that feels both playful and refined.
Perfectly balanced between bold and versatile, Dolce Stripe brings a relaxed California-cool aesthetic to shelves, drawers, cabinets, furniture, and creative DIY projects. Whether you’re styling a cozy kitchen, refreshing a vintage dresser, or adding character to open shelving, this removable contact paper instantly transforms ordinary surfaces into designer details.
Designed for creative homes and stylish renters, Samantha Santana’s premium peel-and-stick shelf liners combine original artwork with durable, high-quality materials for an easy, commitment-free update.
Features
- Removable peel-and-stick contact paper
- Timeless stripe pattern with a modern vintage feel
- Original artwork by Samantha Santana
- Smooth matte finish with rich, vibrant printing
- Durable, non-toxic material
- Printed to order in the USA
- Perfect for shelves, drawers, cabinets, dressers, bookcases, desks, and DIY projects
Each pattern is printed in small batches to ensure crisp detail, beautiful color, and a high-end finish that makes every space feel curated and personal.
Whether your style leans retro, Mediterranean, modern organic, or eclectic vintage, Dolce Stripe adds an effortless layer of warmth and personality to your home.
Explore the full Samantha Santana collection for more retro-inspired florals, playful geometrics, and California-inspired prints designed to make everyday spaces feel beautiful.
Please note: This product is not recommended for countertops, tabletops, or high-heat surfaces.
Share


Material Info
Peel & Stick Contact paper
Peel & Stick
Self Adhesive Vinyl
Our Original, Smooth, Slim Profile Vinyl, Self Adhesive.
- Polymeric plastic film
- Oil & abrasion resistant
- Chemical & Solvent resistant
- Superior best in class tack Repositionable Alignment
- Self Adhesive Removable Sticker
- Renter Friendly
- Easy Removal
- Textured Walls
- Wipeable
- Moisture and Humidity Resistant
- Temporary & Semi Permanent Use
- Includes Smoothing Tool
- Overlapped Joint (1/2 Inch) - Due to material shrinkage, Self adhesive vinyl requires a 1/2 in overlap at every panel seam. This prevent the contact paper from pulling apart overtime and exposing the surface beneath the material.
- Standard MATTE COATING - Polymeric plastic film. Oil & abrasion resistant. Chemical & Solvent resistant. Microsphere adhesive. Superior best in class tack with clean removability. Reposition-able.
- 3.5 mil Slim Profile
- Not Recommended on heavy texture - We do not recommend applying contact paper to heavy textured surfaces like popcorn textured walls.
- Not Recommended on Countertops - We do not recommend applying contact paper to countertops with lots of moisture or heavy use.
How to Install
See our video guide here!
Installing your Peel & Stick contact paper:
BEFORE INSTALLATION:
Allow recently painted or primed surfaces to cure for 4 weeks prior to installing your contact paper.
To prepare your surfaces for contact paper, use a damp cloth or sponge and clean the surface with water. Allow of the walls to dry thoroughly before beginning install.
PREPARE YOUR PANELS
Unroll your contact paper and cut on the dotted lines to separate multiple panels (if using) and layout the panels in numerical order to stay organized. Once your panels are laid out on the floor, check that all panels are free of damage/misprints and the coloring is correct from edge to edge.
If your print was split into multiple rolls, it is imperative to lay out your panels to determine if you are beginning with the correct roll. If needed, please reach out to hello@samanthasantana.com for assistance with this.
APPLYING THE FIRST PANEL
Pick up your first panel labeled panel one. Slowly peel back about 18-24 inches of the backing.
Grab the top corners and gently smooth out the contact paper on the surface. Use the smoothing tool and your hands to remove any bubbles. Repeat to cover your entire surface, matching the pattern when necessary.
FINAL STAGE
Once you’ve applied all panels, use a sharp utility knife to trim any excess at the edges of the surface and any excess paper on the left and right edge of your installation area.
Now you're done! Stand back and admire your beautiful work!